When I first inspected my Ferret it did not have any batteries. I
was assured by the owner that it was driveable and in order to load it
for transport he had to drive it to a position accessible to the transport
truck, I had to provide the batteries. When he tried to start it, he
had to crank it for ages - bad for the starter motor and the engine for
that matter. When unloading it, the vehicle started quite easily and I
concluded that the carby had gone dry from sitting too long. The amount of
cranking required seemed to indicate that the fuel pump was either not
that efficient or on the way out.
Well over 10 years later, the fuel pump still behaves the same. So it
appears it is a case of the carby going dry from lack of use.
It is my theory that the high incidence of Ferret starter motor failures
(my vehicle had only done 500 miles from rebuild when it's starter brushes
wore out shortly after I had bought it!) is due to prolonged cranking. This
will cause either the brushes to wear out or overheating which will ruin
the internal contacts or burn out the windings.
If you are doing an engine pull
Then I suggest you ignore the mod below and instead that you make a simple
extension handle for the manual actuator on your fuel pump. This can easily
be made from something like 5/32" fencing wire or similar steel rod.
Decide on what will be a suitable length for the wire so that it will
sit high enough to be accessible but not so high as to get bent by the
engine cover or foul anything.
Make a loop in one end so that you now have a finger pull and at the
other end make a smaller loop that goes around the manual actuator on the
fuel pump. You will then need to attach something to the fuel pump actuator
on either side of the wire so that it will not slide down the actuator and
end up in a useless position. In effect you will be making a "shoulder"
on each side of the wire in some way or other.
If you want to be really flash, a guide or retainer at the top of the
wire will keep it located where you want it.
In order to "prime" the carby if the engine has not been started for
more than a week, all you have to do is jiggle the wire up and down. When
doing this it is normal to feel quite an amount of resistance. Experience
will soon teach you when the carby is full as the effort required will
become noticably greater - read, hard!
If you get too carried away you will overfill the carby and flood the
motor, so do it sensibly.
If you are NOT doing an engine pull
The mod featured here is to get over this problem without major work.
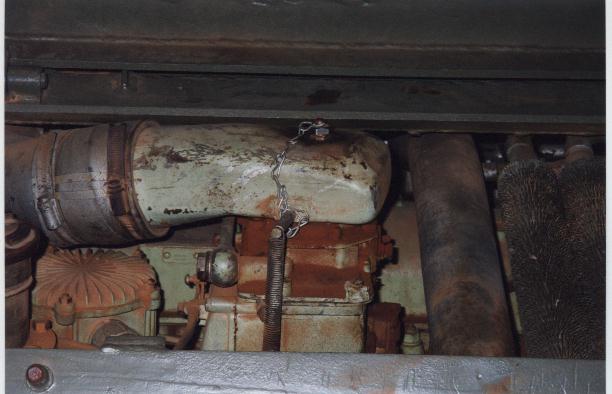
The picture below shows my modification of the carby air horn. It does
involve butchering the air horn and would require some carefull welding
to reverse the mod to original condition.
First off you will need a plug and threaded reducer from the local
engineering or plumbing supplier. Mine is about 5/8"AF spanner size as
I wasn't concerned about the threads involved. I filed the top of the
reducer down till it was about 3/16" high. The plug was of suitably low
profile to begin with.
Next, get a thin profile open end spanner and undo all the hard
to access nuts which attach the air horn to the carby, don't drop any in
the engine bay and make sure you don't drop any down into the inlet
manifold.
Then look down into the carby, you will see a small piece of pipe
sticking into the throat of the carby at about 45°. This is our target.
It is then a case of measuring and plotting a point in the top of the
air horn which is precisely above the hole in the end of that pipe.
Drill a small hole, say 1/4" at the plotted point and test fit the
horn back on the carby and see if the hole and pipe line up. Then enlarge
the hole so that the reducer will fit into it. You will want to shorten
the reducer so that it doesn't project too far into the airflow within
the horn. You will need to find and cut to length a suitable piece of pipe,
lets call it "the priming tube", say an old section of brake line or
similar, which will fit through the
reducer and small enough that the end will sit in the slanted hole in
the 45° pipe in the carby throat.
Next I silver soldered the reducer into the air horn and refitted it.
You will now need to adapt the "the priming tube" to a funnel
(if plastic, it must be fuel compatible) so that you won't spill petrol
everywhere.
By trial and error (and note that this quantity may be applicable
to my vehicle and not yours) I have found that about 40-50ml of petrol
poured down the funnel is usually sufficient to prime the carby. With the
appropriate amount of "Starter Carburetor Control" (choke on any other
vehicle) set, I will typically need to crank the engine for 5 to 10
seconds before it fires up. It appears that once the engine is running the
fuel pump rapidly does its job and fills the carby.
In the picture you will see that I have threaded the plug and fitted
a small bolt to which is attached a chain to stop it being dropped into the
engine bay. The bolt is "straked" (centre punched to swell it) on the
inside of the plug so that it will not vibrate undone. I fitted a copper
washer to the plug to make sure of an air tight seal.
Oh, don't forget to put the plug back in after priming the carby and
before you start the engine.
|
|
These mods allow for easier starting and in my opinion longer starter motor life!
WARNINGS
When using petrol/gas/fuel in an open container to prime the carby don't smoke and be wary of static and ignition sources.
Don't use ANY plastic that is not fuel rated.
You should use a ground strap between bare metal on the fuel container and bare metal on the vehicle. Touch the vehicle with your bare hand BEFORE touching the fuel container. In other words, take all precautions recommended for safe fuel handling. If you aren't familiar with these precautions then obtain a copy by telephoning the customer relations department of an oil company.
DON'T BLOW YOURSELF UP!
Should you figure out a better mod or improvements to this one, please let me know.
If you found this article usefull and especially if you apply it to your vehicle, I would appreciate an email so that I know I am not wasting my time writing articles such as this..

 BACK TO INDEX BACK TO INDEX |