Here are some photos of the replica under construction. Not exactly
professional photography here!
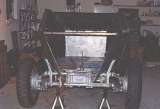
The first phase of construction took place at a my friend Dave Gordon's
house. Dave has an excellent early slat grill
British airborne jeep and a Mk I British airborne jeep trailer.
http://www.io.com/~tog/
Later we moved the replica to building No. 19 at Camp Mabry. Building 19
is where the Texas Armed Forces Museum used to do restorations.
The museum also stored it's saluting guns there, a pair of 75mm pack
howitzers. When the national guard decided to demolish the building we
moved the replica to my house. Building 19 was built during WW1 and was
then a horse stable. The building was haunted.
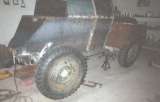
When I started this thing it was a group project. The group wanted
to get going fast so I made working drawings from a scale model and
a few photos. The overall dimensions are very close, but most of the
others were little better than guesswork. If something is wrong, it
is a bit late to do much about it. I never found scale drawings to
check my work, but I believe I made an already small crew compartment
even smaller. I have since obtained a CAD drafting program
and my friend Dave took some good photos of a scout car while
visiting England. I wish I had had both when we started this project.
This particular scout car was painted silver on the inside like early
British tanks. Worked good for photos!
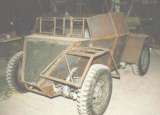
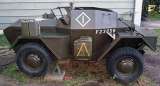
The front armor is hollow. It consists of two layers of 3.2mm steel with
19mm square tube between.

|
Download the big pics by clicking on the small pics...
|
|
Download the big pics by clicking on the small pics...
|
|
Download the big pics by clicking on the small pics...
|
The front visors are hollow, the gun doors are solid 1" thick mild steel.
The driver's visor will be replaced since I now know what the inside looks
like and I cannot alter a hollow visor to look correct. The replacement
will have to be solid.
The sloping front plate is actually 3.2mm with a dummy weld to give the
impression that it's 1" thick.
|
Download the big pics by clicking on the small pics...
|
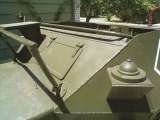
The bonnet is 3.2mm thick, the other body panels are all made from 4.75mm
mild steel it is held in place with four cam locks, I have not figured out
how I will make these yet.
The front and side stowage bin lids were made by a sheetmetal shop.
Everything else was hand shaped.

|
Download the big pics by clicking on the small pics...
|

|
Download the big pics by clicking on the small pics...
|
The frame and engine compartment sides and rear panel are of 16 gauge
(1.6mm) sheetmetal over a tubular steel skeleton.
The engine cooling louvers are made from 3/16 x 2" (4.75x 51mm) angle iron.
|
Download the big pics by clicking on the small pics...
|

|
Download the big pics by clicking on the small pics...
|

|
Download the big pics by clicking on the small pics...
|
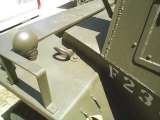
The gunner's seat will be constructed from two 1960's automobile bumper
jacks with 2" (51mm) pipe sleeves for height adjustment, a boomerang shaped
piece of 1/2" (12.7mm) plate for the pivoting base and 1/2" (20mm O.D.) gas
pipe for the seat frame.
The roof support bar was made from 3/4" gas pipe, it's outside diameter is
about 26mm.
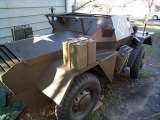
I have made mud flaps from khaki webbing with steel weights sewn into the
bottom edge. I have collected most of the kit for a wireless scout car and
it's crew. I have not found "bleach powder" and anti-gas capes.
My No. 19 set lacks aerials, guards, most of the leads and the control box.
The aerial bases seen in the photos are mock-ups and are on the wrong side.
|
Download the big pics by clicking on the small pics...
|
The two gallon petrol tins are: 2- C/|\ '42, 1- US made 1940 and one Brit
from 1941. Each has a different cap: Shell, Shell-Mex, Esso and plain.
The '40 dated can has a metal disc riveted to the underside of the handle. This disc
is a bit wider than the handle. I suspect this was for night time
identification?
My tyres and wheels are from a M151, they are 7.00x16, the tyres are
29.5" (75 cm) in diameter. I believe they are about 2" (52mm) too small.
The wheels measure 17.5" (44.5 cm). My guess is they're about 3" too small.
I can find nothing this side of the pond that's a better match.
|
Download the big pics by clicking on the small pics...
|
I have the gunner's seat all figured out, but I do not know how the
driver's seat is mounted or adjusted.
I have no good photos of the area beneath the radio shelf, (shelf supports
and battery mounting).
I have seen what looks like a two tiered magazine rack for the gunner to
scrape his knees on.
I purchased a photocopy of a scout car service manual. It has lots of good
information on parts I don't
have. It refers to the tail lamp, but has no good picture of it. I have a
red glass lens from a WW II US vehicle, it is about 1-1/2" (37mm) in
diameter. I am hoping that this lens mounted in a suitably sized grommet
will look correct.
I believe the side lights I bought from a fellow in England are the
correct style. I haven't tried to find bulbs yet. I have a second WW II
US made blackout lamp that will have a regular sealed beam lamp for
night driving around the battlefield.
|
Download the big pics by clicking on the small pics...
|

|
Download the big pics by clicking on the small pics...
|
The rear visor is missing the center hinge because I temporarily lost it.
These were made from scratch.
There are no screw heads visible around this visor as I have not made the
operating lever or latch yet.

|
Download the big pics by clicking on the small pics...
|
I have most of an operational WS #19 set. I need a list of parts for a
scout car installation kit. I believe I need a control unit No. 3 or
No. 3A, but I am not sure about anything.
I have seen photos of many different field modifications on scout cars.
One photo I found showed two petrol cans located
where the tool box and adjacent stowage bin were supposed to be. I chose
to put only one here, so I
could keep the stowage bin. This petrol can is actually my fuel tank. The
fuel tank will be a dummy. I plan to use it to hide the bottles and
regulator for a gas operated Bren gun.
P.S. The vehicle markings on the rear are incorrect magnetic ones a
friend had. I plan to change some of the painted ones, especially those
giant aiming marks on each side!
My thanks to Fred.

BACK TO INDEX


